The Outline Editor™: How to Use the Tool for Outlining Success
July 22, 2022
Have an idea for a movie or TV pilot and want to write a screenplay, but you don’t know where to begin? Not only does Final Draft offer industry standard formatting for feature and TV scripts, but it also has various outlining tools that can help you construct and piece together your story at the earliest stages. One of the most important tools available in Final Draft 12 is the Outline Editor.
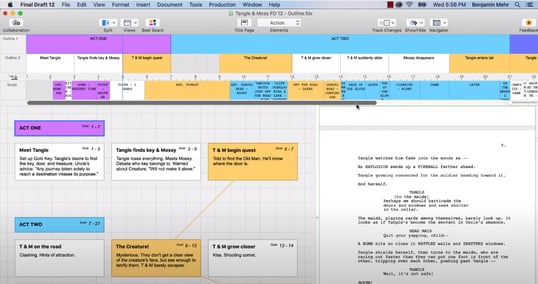
The Outline Editor is located directly beneath the Toolbar and is comprised of horizontal lanes. It’s a place to visually plan and track important movements in your script by associating them with specific page ranges. It can be used for outlining a script and it works in conjunction with the Beat Board™ (which you can access via the View tab). The Beat Board is where you can create the beats in your screenplay (smaller story events that happen within a larger sequence).
You can toggle the Outline Editor view on and off in the view menu. The Outline Editor can be made taller or shorter by hovering over the bottom of the panel beneath the horizontal scroll bar until a cursor appears, which allows you to resize the Outline Editor by dragging it up and down. Located at the bottom right of the Outline Editor is the zoom slider, which you can move right to left. This enables you to focus on a handful of pages or an entire script (the zoom can be as granular as 1/8s of a page, mirroring how scripts are measured during the production process).
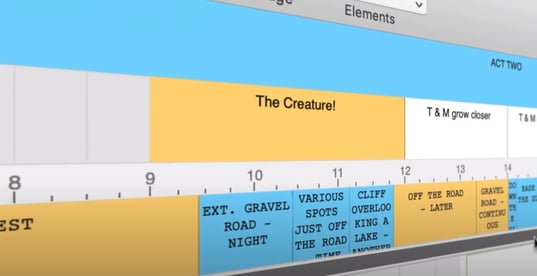
The Outline Editor’s top two horizontal lanes are labeled Outline 1 and Outline 2. One way to use the dual lanes is for Outline 1 to represent acts and for Outline 2 to represent the scene sequences or beats in each act (a box for each beat). Beneath these two lanes is a numbered lane, resembling a ruler, which represents the page numbers of your script (aka the Page lane). The Page lane helps you to know exactly where your scenes occur in your actual script. If while you’re writing your script you want to check to see if a character introduction or specific event has happened on a certain page, simply view the Outline Editor and find this introduction or event and look at the corresponding page range beneath the beat.
If you have an idea for an act, sequence, or scene, you can write that idea inside a color-coded beat (utilizing the Beat Board). If you know which page you’d like a specific beat to occur by, simply drag the beat to the appropriate spot on Outline 1 or Outline 2. An Outline beat in the same color will appear above the page number. The corresponding beat on the Beat Board will update to show the current Outline beat page range. Throughout the entire outlining process, you can always revise and rearrange your beats. This allows you to improve upon your outline without having to start from scratch.
Outline beats default to half a page but can be resized to however long you need or even down to an eighth a page. When a beat is resized in the Outline Editor, the corresponding beat on the Beat Board will update in real-time. If you want multiple beats within a specific page range simply resize the beat or use multiple lanes.
Clicking on an Outline beat displays a preview featuring the beat’s title and body, including any images you have stored in the beat. The preview’s title and body can be edited, and any changes made to a preview will update the beat on the Beat Board. Want to refresh your memory about a certain event before outlining further? Simply click on the appropriate beat, read the content inside the preview, and you’ll be good to go. Also double-clicking on the Outline beat locates the corresponding beat on the Beat Board if the beat is out of view. This is likewise handy if your memory needs refreshing.
Discovered a better direction to take your story or simply want to tighten things up? On the Mac, beats can be removed from the Outline Editor by right-clicking or control-clicking and choosing “Remove” from the context menu. On Windows, remove beats by simply right-clicking and choosing “Remove”.
Acts in Outline 1 are considered “the parents” to any beats whose page range begins beneath them in the Outline 2 lane. Therefore, if you move one of the acts, the beats associated with it will be moved as well. Depending on how detailed you want your outline, you can also use Outline 1 for larger beats and Outline 2 for smaller beats contained within the same page range (its connectivity to the Beat Board remaining). Beats can also be dragged from the Outline 1 lane to the Outline 2 lane, and vice versa.
The bottom lane of the Outline Editor represents actual scenes in your script. if you’ve color-coded scenes in your script, the colors will be visible in the horizontal line of the Outline Editor. Double-clicking the scene scrolls to that page. You might also notice a vertical blue line on the Outline Editor. This blue line indicates where in the script the cursor is currently located. If the cursor is moved to page 5, the location indicator on the Outline Editor updates.
Another useful feature of the Outline Editor is control-clicking for Mac or right-clicking for Windows to set the target script length. This changes the length of the Outline Editor and provides a visual framework for your story structure. If your script goes over the target script length, the additional page numbers turn red. Want your climax to happen between pages 80 and 90? Following a targeted script length will keep you on a tight and steady path.
Finally, if you’re ready to send your Outline beats to your script, press the “Send Outline to Script” button on the Outline Editor’s left panel. The content of the Outline beats will appear in your script as outline elements. The titles of Outline 1 and Outline 2 beats will appear as Outline 1 and Outline 2 elements respectively. The beats’ bodies will appear as Outline Body elements. Outline 2 beats will be placed under their Outline 1 parents, and just like that, you’ll have a rough draft to build on! Start fleshing out the document with other script elements (scene headings, action, dialogue, etc.) and before you know it, your rough draft will be a finished draft!
By using the Outline Editor, you’ll be able to turn your idea for a screenplay into an actual screenplay without ever getting lost in the process.